
Using the Forward TX function
Forward TX is a function that transfers a received fax, Internet fax, or IP address fax to a pre-specified destination.
Faxes can be forwarded to personal e-mail addresses or saved in a shared folder in a computer. Received faxes can be converted to files that can be handled by a computer, which saves printing costs.

-
If the forwarding destination is not a fax address, the received fax can be converted in the specified file format to be forwarded to a destination. The file types able to be specified are PDF, XPS, and TIFF.
Other file types can be specified only for the first line. To specify other file types, ask your service representative to configure settings. For details, contact your service representative. -
This function cannot be used together with the following functions.
PC-Fax RX, TSI Routing, Memory RX -
When multiple lines are used, you can select [Fax Settings] - [TX/RX Settings] - [Individual Receiving Line Setup] in the administrator mode to enable the Forward TX function for each line.
-
In the administrator mode, select [Fax Settings] - [Function Setting] - [RX Data Operation Settings] - [Forward TX Setting], then click [OK].
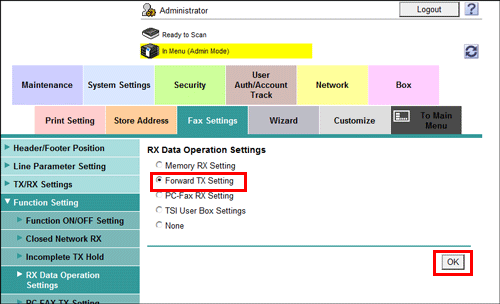
-
Select a fax function to configure the Forward TX function.
-
To forward a fax received on this machine, click [Edit] of G3 Fax in [Select Fax Settings].
If multiple lines are used, click [Edit] of the line to configure the Forward TX function in [Line Settings].
-
To forward an Internet fax received on this machine, click [Edit] of Internet Fax in [Select Fax Settings].
-
To forward an IP address fax received on this machine, click [Edit] of IP Address Fax in [Select Fax Settings].
-
-
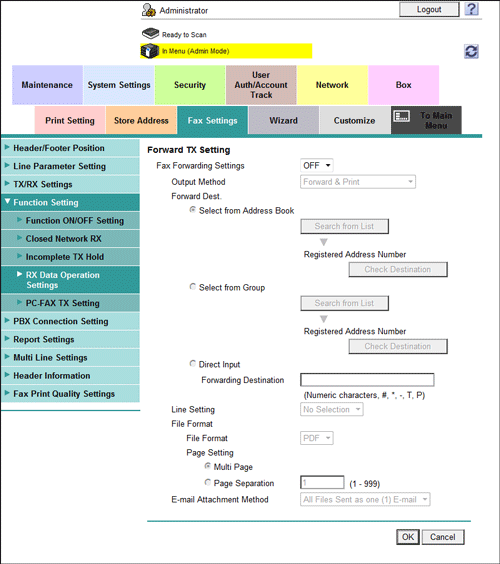
At [Forward TX Setting], configure the following settings.
Settings
Description
[Fax Forwarding Settings]
Select [ON] to use the Forward TX function.
[OFF] is specified by default.
[Output Method]
Select whether to print a received fax on this machine when forwarding it.
-
[Forward & Print]: A received fax is forwarded and printed on this machine.
-
[Forward & Print (If TX Fails)]: A received fax is forwarded and printed on this machine.
[Forward & Print] is specified by default.
[Forward Dest.]
Specify a forwarding destination for a received fax.
-
[Select from Address Book]: Forwards a fax to a destination registered in the address book on this machine.
-
[Select from Group]: Forwards a fax to a group registered on this machine.
-
[Direct Input]: Forwards a fax to the fax number you enter.
[Line Setting]
If multiple lines are used, select the line used to send a fax. If [No Selection] is selected, either line, whichever is not busy, is used for transmission.
[No Selection] is specified by default.
[File Format]
Select a file type to forward a fax.
You can convert a fax into a file except when the destination is a fax.
[PDF] is specified by default.
[Page Setting]
Select a filing page unit when a received fax contains multiple pages.
-
[Multi Page]: Select this check box to convert all pages to a single file.
-
[Page Separation]: Select this check box to convert each page to a separate file.
[Multi Page] is specified by default.
[E-mail Attachment Method]
You can select the E-mail attachment method when the forward destination is an E-mail address and [Page Setting] is set to [Page Separation].
-
[All Files Sent as one (1) E-mail]: Attaches all files to one E-mail.
-
[One (1) File per E-Mail]: Sends one E-mail for each file.
[All Files Sent as one (1) E-mail] is specified by default.
-