Checking the Name and Function of Each Part in This Machine
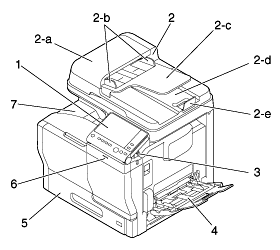
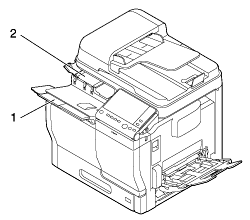
Front
No. | Name | Description |
|---|---|---|
1 | Control Panel | Used to configure various settings in this machine. |
2 | Automatic Document Feeder | Automatically feeds and scans originals by page. This unit also reverses and automatically scans 2-sided originals. This unit is referred to as ADF in the manual. |
2-a | ADF Feed Cover | Open this cover when clearing a paper jam in the ADF. |
2-b | Lateral Guide | Adjust this guide along the width of the original. |
2-c | Original Tray | Load the original face up in this tray. |
2-d | Original Output Tray | The scanned original is fed out onto this tray. |
2-e | Document Stopper | Used to prevent the output original from falling. |
3 | USB Port (Type A) USB2.0/1.1 | Used to connect an external memory unit (USB memory unit) to this machine. |
4 | Bypass Tray | Used to print data on non-standard size paper or envelopes. For details on the available types of paper, refer to Here. |
5 | Tray1 | Allows you to load up to 550 sheets. For details on the available types of paper, refer to Here. |
6 | Data Indicator | Flashes or lights up to indicate the data receiving status on this machine. For details, refer to Here. |
7 | Output Tray | Outputs printed pages. bizhub C3851FS is equipped with the Finisher. For details, refer to Here. |
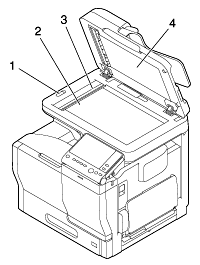
Front: Status with Automatic Document Feeder opened
No. | Name | Description |
|---|---|---|
1 | Scanner Lock Lever | Used to lock or unlock the scanner. To use this machine, unlock the scanner. |
2 | Original Glass | Used to load the original. |
3 | Slit Scan Glass | Used to scan an original image when using the ADF. This unit is referred to as a Slit Scan Glass or Original Scan Glass in the manual. |
4 | Original Cover Pad | Fixes the loaded originals. |
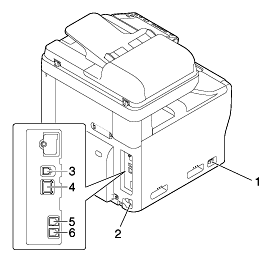
Side/rear
This view shows the machine with the optional Fax Kit FK-517 installed.
bizhub C3851FS/C3851 provides the Fax Kit FK-517 as standard.
No. | Name | Description |
|---|---|---|
1 | Power Switch | Press this switch to turn the machine on or off. |
2 | Power Connection | Connect the power cord to this inlet to supply power to this machine. |
3 | USB Port (Type B) | Connect to this port when using this machine as a USB-connected printer. |
4 | Ethernet (LAN) Port (1000Base-T/100Base-TX/10Base-T) | Connect to this port when using this machine as a network printer or network scanner. |
5 | LINE (telephone line) Jack | Used to connect a general telephone subscriber line. |
6 | Jack for connecting a telephone (TEL) | Used to connect a telephone cord. |
Inside

No. | Name | Description |
|---|---|---|
1 | Fusing Unit | Used to fuse toner to paper using heat and pressure. |
2 | Right Door | Open this door to clear a paper jam. |
3 | Paper Transport Unit | Transports paper. When performing 2-sided printing, this unit reverses paper. |
4 | Laser Lens Cleaning Tool | Clean the surface of the Print Head Glass. |
5 | Front Door | Open this door to replace the Toner Cartridge, Imaging Unit, or Waste Toner Bottle, and to clean the Laser Lens. |
6 | Waste Toner Bottle | Used to collect used waste toners. |
7 | Imaging Unit | Used to create a print image. |
8 | Toner Cartridge | This machine provides Toner Cartridge in four colors: cyan (C), magenta (M), yellow (Y), and black (K). A full-color image is created by combining the four toner colors. |
Finisher (bizhub C3851FS)
No. | Name | Description |
|---|---|---|
1 | Main Tray | Outputs printed pages. |
2 | Processing Tray | Used to conduct stapling. Also, this tray is used to output the printed sheets to the Main Tray. |
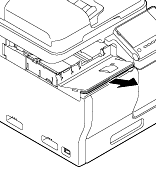
The output tray of the Finisher can be extended to prevent the printed sheets from falling.
Hold the handle in front of the Main Tray, then pull out the extension tray forward.
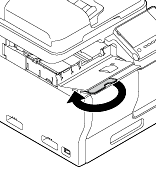
Turn the drawing part of the extension tray counterclockwise, then insert it into the Main Tray.
Lift the extension tray on the left of the Processing Tray.
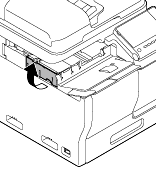
Preparations are then complete.